Introduction
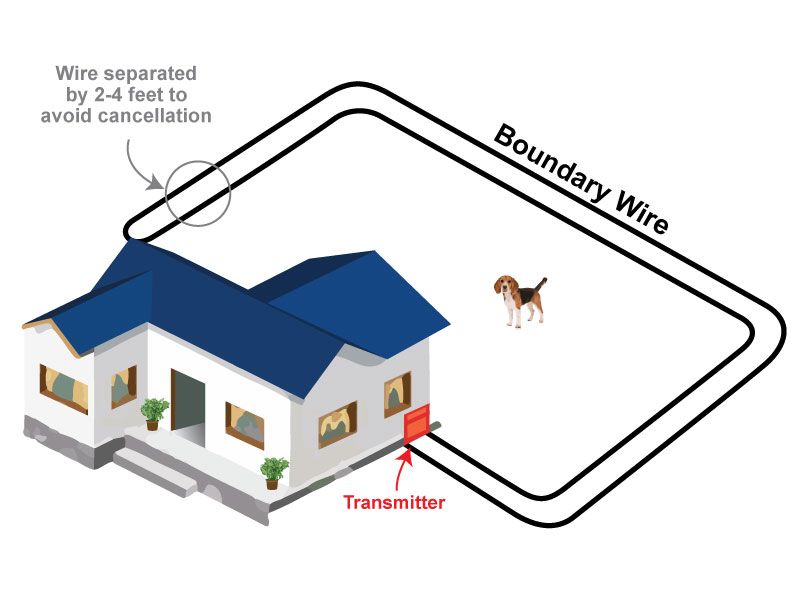
Electric dog fences, also known as electronic or invisible fences, provide a safe and humane way to keep dogs within a defined area without building a physical barrier. The system works by burying a wire that transmits a radio signal around the perimeter you want to contain the dog. When the dog approaches the boundary, a receiver on its collar emits a warning followed by a mild but harmless static correction to deter the dog from crossing. By training the dog on the boundary lines, the system reinforcements a dog’s natural desire to stay close to home.
While installing an electric dog fence requires some planning and labor for initial setup, it offers convenience and flexibility to contain pets without compromising aesthetics or hindering landscaping. This guide will provide an overview of the complete installation process, from planning the layout to training your dog, so you can reap the benefits of a contained and safe pup.
Choosing a Location
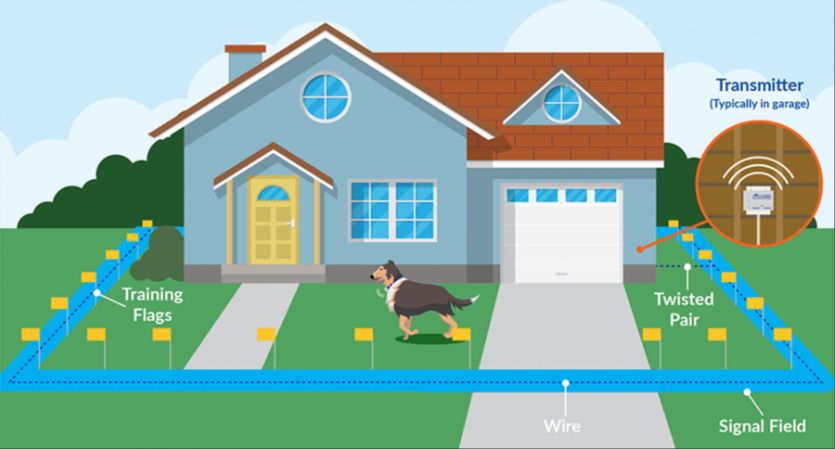
When choosing a location to install your electric dog fence, you’ll want to consider some ideal areas as well as hazards to avoid. According to the Lowes guide, the transmitter should be located indoors in a dry, protected area like a garage. Make sure to avoid placing it near a breaker box.
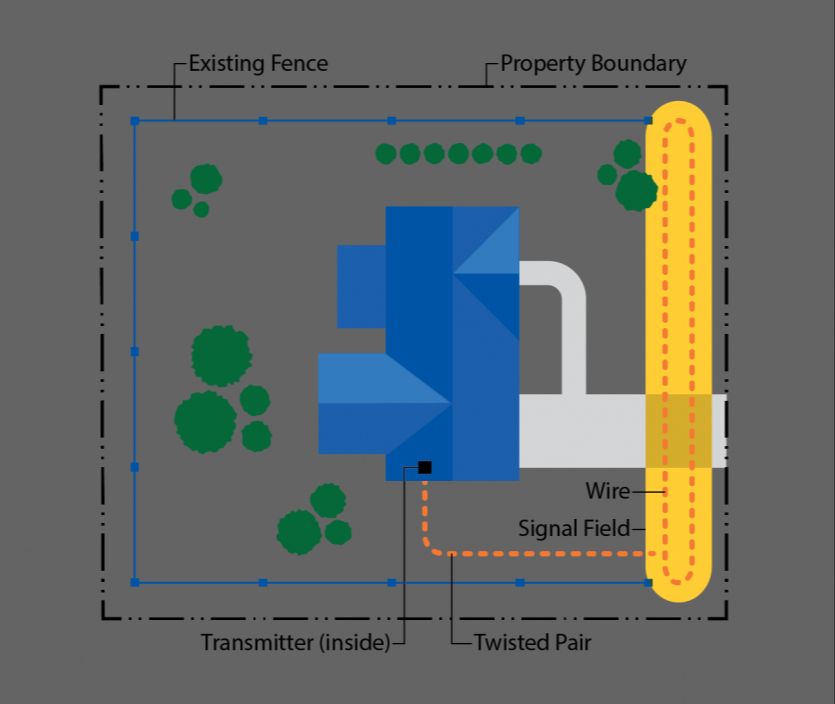
For running the wire, good options include along a physical fence or property line, or encircling areas like gardens that you want to protect. Avoid locations like over asphalt or near underground pipes where you may not be able to properly bury the wire. Also avoid areas where the signal could be disrupted like near power lines or utility boxes according to Angi’s guide.
The key is choosing an open grassy area with good wire access so you can cleanly outline the desired boundaries. Make sure any sidewalks, driveways or gardens you want to block access to are within the wired boundary area.
Preparing the Yard
Before installing an underground dog fence, the yard needs to be prepared by clearing any obstacles and grading the landscape. Remove all large rocks, roots, weeds, brush and debris to create a smooth surface for burying the wire (Source). Use a lawn mower to cut the grass very short, about 1-2 inches high. Rake up any remaining grass clippings or leaves.
Level any holes or uneven areas in the yard with a shovel and rake. The wire needs to be buried at a consistent depth, so grading the yard will make installation easier. Fill in any dips or low spots with topsoil until the surface is flat. A yard with a smooth, even grade allows the boundary wire to be buried at the proper depth across the entire layout.
Planning the Layout
Mapping out your yard is one of the most crucial steps when installing an underground dog fence. Carefully planning the layout will ensure the fence can effectively contain your dog within the desired boundaries. Take time to determine which areas of the yard you want your dog to access and which areas should be off-limits.
Walk around the perimeter you want to fence and map out the boundaries using spray paint or flour. Consider any access points like gates, doors or sidewalks and decide if you want your dog to have access. Also take note of obstacles like trees, pools or gardens that may interfere with the wire signal.
Draw out your boundaries on a sheet of graph paper, indicating any areas you want to block off from your dog. Most installers recommend keeping the wire 5-10 feet from any physical barriers to allow space for the warning zone. Ensure any gates or sidewalks meant for access have a small gap in the wire boundary.
Following a planned layout will make the installation process smooth and effective. Take time on the front end to map out the ideal boundaries for containing your dog within the desired areas.
Measuring and Cutting Wire
An important step when installing an underground dog fence is measuring how much wire you need and cutting it to the proper length. The amount of wire required depends on the size and layout of your yard. As a general rule, allow for about 100 feet of wire for every 10 feet of distance to be enclosed. It’s better to have extra wire than not enough.
To determine the amount needed:
– Walk around the perimeter of the area to be enclosed, measuring the distances as you go.
– Add up the total linear footage.
– Add 10% more as a buffer.
It’s recommended to use 14-gauge copper wire for durability and signal transmission. Once you know how much you need, use wire cutters to cut the wire to the desired length.
Make sure to leave 3-5 feet of extra wire at the starting end to connect to the transmitter. Also leave 12-18 inches of slack at any corners or curves to allow the wire to bend. Avoid kinks, twists, or tight bends when laying out the wire.
Burying the Wire
Proper wire burial depth is important for the system to function correctly. Most experts recommend burying the wire 1-3 inches below the surface (Source). Burying too shallow could lead to wire damage, but burying too deep can weaken the signal.
There are two main methods for burying the wire:
Trenching
Using a spade or trencher, dig a trench 1-3 inches deep where you want to lay the wire. Place the wire at the bottom of the trench, then backfill and compact the soil. Trenching gives you the most control over depth.
Sod Cutter
A sod cutter slices under the grass to cut a channel for the wire without fully digging up the yard. Set the sod cutter blade depth to 1-3 inches. Lay the wire in the sliced channel, then firmly press the grass strip back in place.(Source)
The sod cutter method is faster and less messy than trenching. However, it doesn’t allow as much precision for depth control.
Connecting the Transmitter
After the boundary wire is installed underground, the next step is to connect it to the transmitter or base unit that sends the radio signal through the wire. It’s crucial to connect the wires properly for the system to function.
First, locate the two connection terminals on the transmitter labeled “loop” or “boundary wire.” Strip about 1/2 inch of insulation off the ends of the boundary wire using wire strippers. Twist the exposed copper wires tightly together.
Insert one boundary wire end into one of the loop terminals, twisting clockwise to tighten it in place. Insert the other boundary wire into the other loop terminal and tighten.[1] Ensure a strong connection by tugging gently on the wires.
Next, plug in and turn on the transmitter per the manufacturer’s instructions. Walk along the buried boundary wire with the training collar held to the ground to test that signal is being transmitted consistently. Adjust connections if there are any gaps in the signal. Your underground electric dog fence should now be ready for training.
Installing Warning Signs
Proper placement of warning signs is crucial for alerting people to the presence of an invisible electric dog fence. Warning signs should be placed at all access points, gates, and along the boundary line no more than 100 feet apart 1. The signs should be weatherproof and clearly visible. They should state “Caution: Electric Fence” or similar wording.
The signs should be placed at eye level for adults. For fences along sidewalks and rights of way, place the signs at a height that makes them visible to pedestrians and bicyclists. Do not place the signs too high, or they may not catch people’s attention.
Make sure to use high quality warning signs that will hold up in outdoor conditions. Replace any signs that become faded, damaged, or overgrown by vegetation. Proper maintenance of warning signs is essential for ongoing safety.
Training the Dog
Training your dog to the buried wire boundary is a key part of ensuring your electric dog fence system works properly. It’s important to take the time to properly acclimate your dog to the boundaries so they understand where they can and cannot go. According to experts, pet fence training should involve a gradual process over 10-15 days to teach your dog the new limits (https://www.petsafe.com/blog/how-to-train-your-dog-to-your-new-containment-system/).
Start by walking your dog on a leash around the buried wire boundary so they can become familiar with the layout. Use positive reinforcement like treats and praise when they turn around at the “warning” beep sound. It’s ideal to do short 10-15 minute training sessions multiple times per day. Remove the receiver collar in between sessions so your dog doesn’t become overwhelmed. Increase the amount of time spent training along the boundary each day. The goal is to acclimate your dog slowly so they fully understand where they can and cannot safely roam.
Maintenance
Proper maintenance is crucial for keeping your electric dog fence running smoothly and effectively. Over time, the boundary wire can become damaged or corroded, reducing the strength of the radio signal. It’s important to periodically check the wire for any breaks or damage. Test the wire with a voltmeter to ensure it is emitting a signal (petcontrolhq.com/blogs/resource-library/electric-dog-fence-faq).
The transmitter and collar batteries will also need to be replaced about once a month, depending on usage. Use only manufacturer recommended batteries. Check that the transmitter is functioning properly and providing consistent power to the boundary wire. Refer to the product manual for instructions on changing the transmitter battery (www.invisiblefence.com/faq).
Inspect all wiring connections, looking for any loose or corroded contacts. Clean contact points with alcohol and securely reconnect wires. Check for damage to insulation and expose wire. Splice or repair any degraded wiring sections. Bury any unearthed sections of wire. Proper wire maintenance ensures your electric fence remains highly effective at confinement training your dog.
