Why Nail Trimming Is Important
Regular nail trimming is essential for maintaining your dog’s foot health. When a dog’s nails become overgrown, they can cause significant problems. Long nails alter the way a dog’s feet hit the ground, putting more pressure on the toes. This can lead to pain, arthritis, and other orthopedic issues over time.
Overly long nails may also split or tear, creating openings for bacteria and infection. Long nails get caught on surfaces like carpeting and scratch floors and furniture. Allowing your dog’s nails to overgrow can impact their mobility and comfort. Trimming them regularly prevents injury and foot problems. Maintaining proper length enables your dog to walk normally and without pain.
How Often To Trim
How often you need to trim your dog’s nails depends on several factors, but a general rule of thumb is every 2-3 weeks for active dogs and every 3-4 weeks for less active dogs. Puppies and young dogs will need more frequent trims as their nails grow more quickly. Adult dogs with slower nail growth can go a bit longer between trims.
Make sure to keep an eye on your dog’s nails and how quickly they grow. If you hear them clicking on the floor, it’s time for a trim. Long quicks can develop if the nails get too long between clippings. Frequent gentle trimming is better than waiting a long time.
For a puppy or highly active dog, start with trimming every 2 weeks. For an older or couch potato dog, you can likely go 3-4 weeks. Adjust based on how fast the nails grow back. Ask your vet for advice if unsure how often your specific dog needs nail care.
What You’ll Need
Trimming your dog’s nails properly requires having the right tools on hand. Here are the key supplies to have ready before getting started:
- High-quality clippers – Invest in a good pair of dog nail clippers. Look for clippers specifically designed for dogs, with sharp, well-aligned blades for a clean cut. The right clippers make the job much easier.
- Styptic powder – Have some styptic powder or gel on standby. This helps stop bleeding if you accidentally cut the quick. It’s an essential precautionary item.
- Treats – Keep your dog’s favorite treats nearby. Offer treats frequently to keep your dog relaxed and reward good behavior during the process.
Having the proper tools close at hand will make the nail trimming experience easier and less stressful for both you and your dog.
Prepare Your Dog
Proper preparation is key to ensuring a stress-free nail trimming experience for both you and your dog. Here are some tips on getting your dog ready:
Handle their paws frequently. Make it a habit to gently touch your dog’s paws often during playtime, petting, and cuddle sessions. This will help desensitize them to having their paws handled.
Introduce the clippers slowly. Let your dog sniff, lick and paw at the clippers while giving treats. Click the clippers closed without trimming to get them used to the sound.
Use treats and praise. Give treats like small pieces of chicken or cheese after touching their paws or clipping a nail. Verbal praise is also important to make them feel at ease.
Go slow and keep sessions short. Don’t try to trim all nails at once. Introduce the tools and sensations gradually, doing just a paw or two per session.
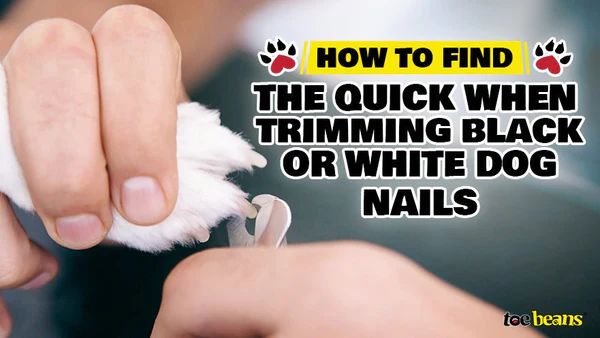
Identify The Quick
The quick (also called the live blood vessel or nerve) is the pink tissue inside the nail that cauterizes when cut, much like when we cut our fingernails too short. Identifying where the quick is before trimming your dog’s nails is crucial to knowing how short you can safely cut them.
To find the quick, look at the nail head-on. The quick is the pinkish area inside the translucent nail. The closer the quick gets to the end of the nail, the shorter you’ll be able to cut. The farther away it is from the tip, the more nail you can safely remove.
Press lightly on the nail to see the pink tissue move closer to the end. But be very careful not to push hard enough to cause your dog discomfort or pain. If your dog has dark nails, identifying the quick takes a bit more finesse. Look for a dark dot toward the end of the nail. Apply gentle pressure to see if the dot moves closer to the tip.
It’s always better to trim too little at first, then cautiously removing a bit more later. We never want to risk hitting the quick. So when in doubt, be conservative with your cuts.
How Short To Cut
When cutting your dog’s nails, you’ll want to cut fairly close to the quick but not actually into it. The quick is the pink part inside the nail that contains nerves and blood vessels. If you cut into the quick, it will bleed and be painful for your dog.
A good rule of thumb is to cut 2-3 millimeters away from the quick. The quick usually ends a little ways before the very tip of the nail, so you want to stop cutting when you see a grayish oval start to appear in the center of the nail. That is a visual cue that you are approaching the quick.
If you cut into the quick, it’s not the end of the world. Apply some styptic powder or baking soda to stop the bleeding. But try to avoid hitting the quick if you can.
It’s always better to cut too short than not short enough. Long nails can cause discomfort and problems for dogs. If in doubt, trim a little and check again in a few days. Frequent trimming is better than waiting until nails get very long.
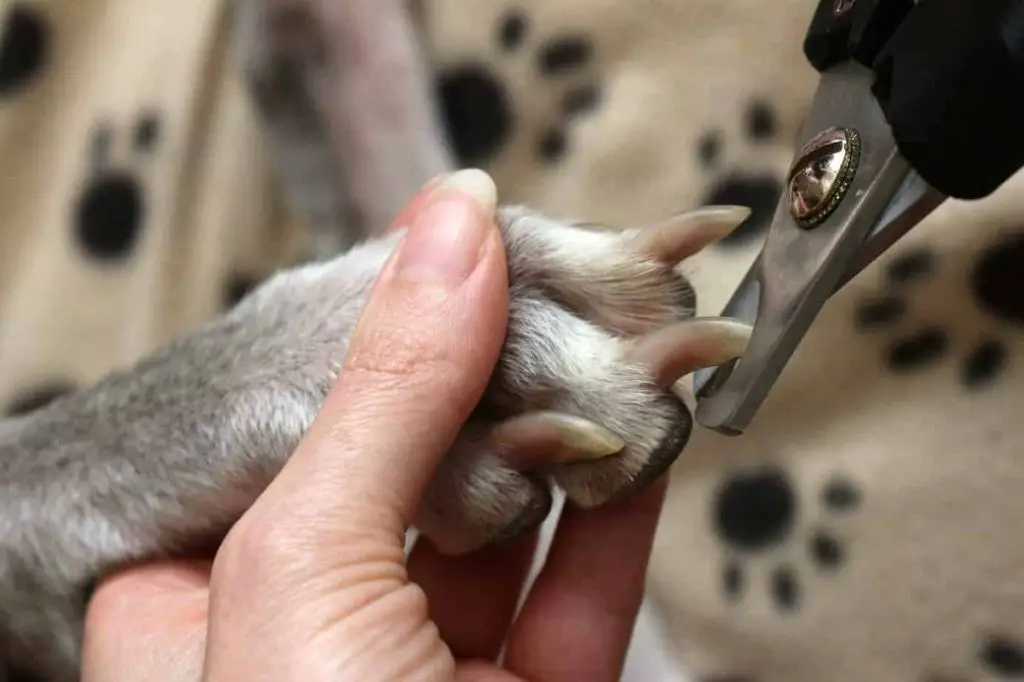
Technique Tips
Proper technique is important when trimming your dog’s nails to avoid discomfort or bleeding.
Hold your dog’s paw gently but firmly as you cut the nails. Having a steady grip will make it easier to control the clippers and get a clean cut.
Aim to cut the nails straight across in one motion. Angling the clippers or making partial cuts can crush the nail and be painful.
Only take small clips of the nail at a time, about 1/8 inch or less. Removing too much at once risks exposing the quick and causing bleeding.
Work carefully and patiently. Stick to these small, straight across clips and pause between nails to keep the experience calm for both you and your dog.
Signs To Stop
As you cut your dog’s nails, keep an eye out for these signs that mean you should stop:
- The quick becomes visible. The quick is the pinkish area inside the nail that contains nerves and blood vessels. If you see it, stop cutting immediately.
- The nail starts to bleed. Even a drop of blood means you’ve cut into the quick. Quickly apply styptic powder or cornstarch to stop the bleeding.
- Your dog protests. If your dog cries, whines, or pulls away, they are likely feeling discomfort. Immediately stop and comfort your dog before considering whether to try trimming again.
These are clear indicators that you’ve cut the nails too short and have hit the quick. The most important thing is to stop right away once you notice any of these signs to avoid further pain and bleeding. It’s better to leave a nail slightly too long than cut it too short.
Aftercare
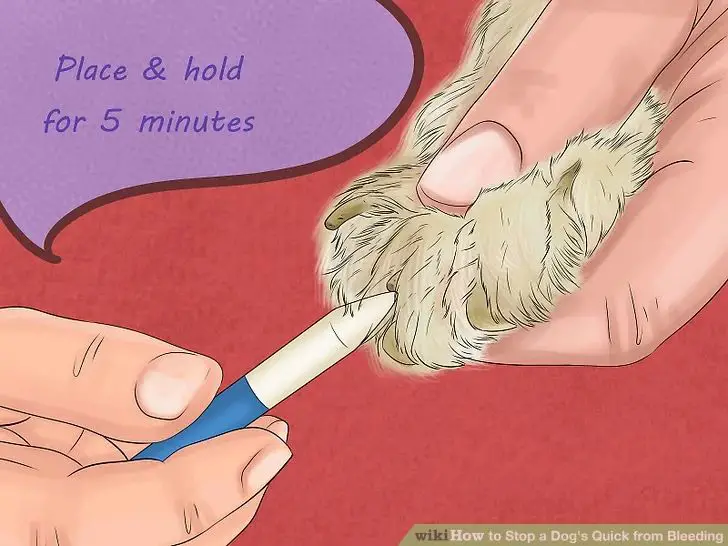
If your dog’s nail happens to start bleeding from being cut too short, don’t panic. Apply some styptic powder or styptic pencil to quickly stop the bleeding. These products work by contracting the blood vessels and forming a clot. Simply pinch the nail to hold pressure and dab on the styptic. Hold for 30-60 seconds until the bleeding stops. Praise your dog and give treats during this time to avoid creating a negative association with nail trims.
Keep an eye on the trimmed nails for a few hours afterwards looking for any additional bleeding. If the bleeding persists, you may need to reapply the styptic treatment. Generally bleeding will cease once a clot fully forms.
Make sure to continue monitoring your dog’s nails in the days following the trim. If they seem sensitive or painful, allow more time before the next trim. Providing praise and treats after nail trims will help your dog have a more positive association going forward.
When To Seek A Vet
In most cases, dog owners can safely trim their dog’s nails at home. However, there are some situations where it’s best to seek professional help from your veterinarian:
Overgrown Nails: If your dog’s nails are very overgrown, the quick may have extended inside the nail. Cutting severely overgrown nails runs a greater risk of hitting the quick, which can be painful and cause bleeding. Have your vet trim the nails back to a normal length before doing maintenance trims yourself.
Issues Seeing the Quick: The quick isn’t always easy to see, especially in dogs with black or dark-colored nails. If you’re unable to identify the quick, it’s best to leave nail trimming to the professionals to avoid potential injury.
Anxiety: Some dogs are anxious or stressed by having their paws handled. If your dog struggles or resists having their nails trimmed, talk to your vet. They can suggest techniques to make it less stressful or provide sedation if needed.
Medical Conditions: Certain medical conditions can affect nail health and structure. For example, overgrown nails may be a sign of arthritis making it difficult for the dog to walk and wear them down. Consult your vet if you notice any abnormalities.
Seeking professional help protects your dog from injury while trimming overgrown, damaged, or otherwise problematic nails. Your vet can show you the proper technique to continue care at home. With routine trims, you can likely handle trimming your dog’s nails yourself. But don’t hesitate to involve your vet if challenges arise.