Introduction
Properly cleaning your dog’s ears is an important part of keeping them healthy and happy. Dog ears are prone to developing infections if not cleaned regularly. Left untreated, these infections can lead to painful earaches, hearing loss, and other medical issues. By establishing a regular ear care routine with your dog, you can avoid these problems and keep their ears clean.
Cleaning dog ears might seem daunting at first, but with the right tools and techniques, it can become a quick and rewarding bonding experience for both owner and pup. This guide covers everything you need to know about canine ear cleaning best practices. Read on to learn the signs that your dog’s ears need attention, how often they should be cleaned, step-by-step instructions, and when to seek veterinary assistance.
With some basic knowledge and the proper supplies, keeping your dog’s ears clean will be simple. Regular ear care promotes health, prevents issues, and is an important part of being a responsible pet owner.
Signs Your Dog’s Ears Need Cleaning
There are some obvious signs that indicate your dog’s ears need cleaning. The most common signs include:
Head shaking or scratching at ears: If your dog is constantly shaking his head or pawing at his ears, he is likely trying to relieve irritation or itchiness. Head shaking can also indicate an infection or the presence of a foreign object lodged inside the ear canal.
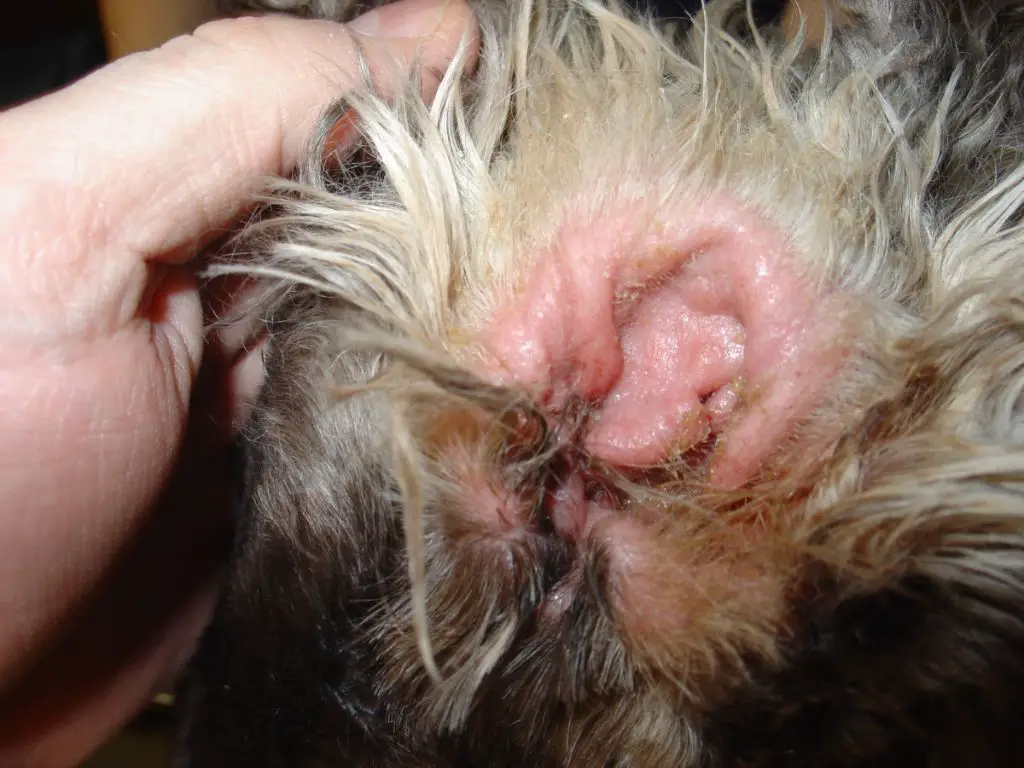
Redness or inflammation in ears: Take a peek inside your dog’s ears. Do the ear flaps look red or swollen? This could signal an infection or allergy that needs to be addressed. Inflammation is the body’s way of responding to an irritant.
Black or yellow discharge: Healthy ears should not have any kind of discharge or fluid draining from them. If you notice your dog has black, yellow, brown or smelly discharge in or around his ears, it indicates the presence of yeast, bacteria or ear mites.
Odor coming from ears: A strong, foul odor is usually a sign something is not right. Both infections and foreign objects can cause unpleasant smells from a dog’s ears. Sniff your dog’s ears occasionally to check for odors.
Risks of Not Cleaning
Not cleaning your dog’s ears regularly can lead to some serious health issues that should not be ignored. Left unchecked, wax and debris buildup in your dog’s ears can cause painful ear infections. These are often accompanied by head shaking and scratching at the ears. Ear infections left untreated can potentially lead to partial or complete hearing loss in dogs. The warm, moist environment of dirty ears also creates the perfect breeding ground for parasites like ear mites. These pesky parasites can then spread to your other pets. Keeping your dog’s ears clean is one of the best ways to prevent these risks.
How Often to Clean
Keeping your dog’s ears clean is an important part of their health and hygiene routine. But how often should you be cleaning their ears? Here are some general guidelines on frequency:
For healthy dogs with no ear infections or other issues, a good rule of thumb is to clean their ears every 1-2 weeks. This regular cleaning helps remove dirt, debris, and waxy buildup before it can cause problems.
For dogs prone to ear infections or other ear problems, you may need to clean their ears as often as 1-2 times per week. Frequent cleaning for dogs with recurring issues helps prevent infection-causing bacteria from taking hold.
Puppies often need more frequent ear cleanings as well, as their ear canals are still developing. Cleaning a puppy’s ears 1-2 times per week can help keep them healthy.
Of course, these are just general guidelines. You should adjust the frequency based on your individual dog’s needs. Signs like head shaking, odor, and discharge indicate it’s time for a cleaning. Your veterinarian can also advise you on an appropriate schedule for your dog.
The key is not to over-clean, but to clean often enough to prevent any buildup issues. Finding the right balance helps maintain good ear health for your dog.
Cleaning Tools
Having the right tools on hand will make cleaning your dog’s ears safer and easier. Here are the supplies you’ll need:
Cotton balls – Use cotton balls to gently wipe out dirt, debris, and excess ear cleaning solution. The soft cotton is gentle on sensitive ear tissue. Opt for unscented cotton balls to avoid irritation.
Cotton swabs – Cotton swabs can help you carefully clean the outer areas of the ear canal. Never insert them deep into the ear canal, as this can cause injury. Use them only to clean visible areas.
Ear wash solution – An ear wash solution formulated specifically for dogs helps flush out debris and wax while controlling bacteria, fungi, and other microbes. Look for a veterinarian-recommended wash containing soothing, antiseptic ingredients.
Step-By-Step Cleaning Process
Follow these steps to properly clean your dog’s ears:
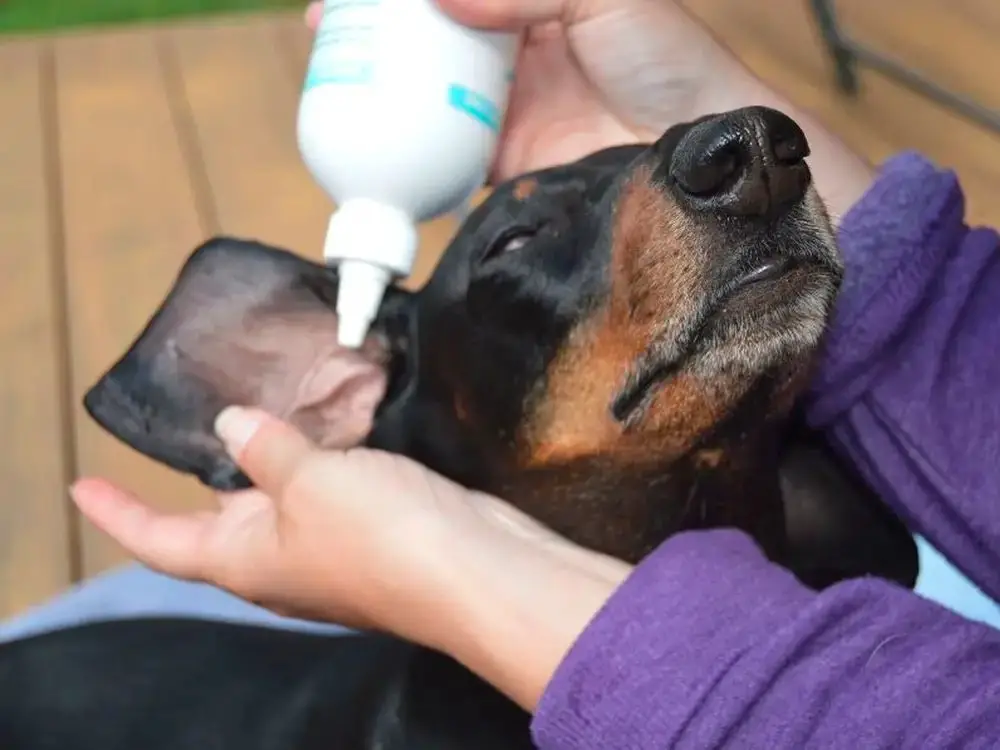
Hold ear flap up to straighten canal
Gently pull your dog’s ear flap up and back to help straighten out the L-shaped ear canal. This allows for better access and cleaning.
Apply ear wash to cotton ball
Dampen a cotton ball or pad with your chosen ear wash solution. Make sure it is thoroughly wet but not dripping.
Gently wipe visible area – do not insert swab
Use the cotton ball to gently wipe around the outer portion of your dog’s ear canal. Do not insert the cotton swab into the ear canal, as this can damage the sensitive inner ear.
Be very gentle, and stop if your dog shows signs of pain or discomfort. It is important not to clean too deep into the ear canal.
Homemade Ear Wash Recipes
If you want to avoid chemicals found in commercial ear cleaners, homemade solutions are a great alternative. Here are two simple recipes to try using ingredients you likely already have at home:
Vinegar, Rubbing Alcohol, and Water
This combination helps remove wax and debris while also drying out the ear canal to discourage bacterial and fungal growth. Simply mix together:
- 1 part white vinegar
- 1 part rubbing alcohol
- 1 part warm water
Use a cotton ball to apply the solution gently into the affected ear, massaging the base. Wipe away any excess with a clean cotton ball.
Glycerin, Apple Cider Vinegar, and Water
Glycerin helps remove wax buildup, while apple cider vinegar’s acidic properties help kill bacteria and fungi. Mix together:
- 1 teaspoon of glycerin
- 1 tablespoon of apple cider vinegar
- 1 cup of warm water
Use an eyedropper to fill your dog’s ear canal with this solution. Massage the base of the ear gently before wiping away any excess liquid.
Over-the-Counter Ear Cleaners
When looking for an over-the-counter ear cleaner for dogs, some key ingredients to look for include:
- Salicylic Acid – This helps break down wax and debris.
- Chlorhexidine – An antiseptic that helps prevent infections.
- Glycerin – A gentle cleaning agent that also helps prevent irritation.
Some popular brand options include:
- Virbac Epi-Otic Advanced – Contains salicylic acid, chlorhexidine, and glycerin. Gentle formula good for routine cleaning.
- Zymox Ear Cleanser – Uses enzymatic formula to dissolve organic matter. Contains glycerin.
- Pet MD Otic Cleanser – Salicylic acid based. Alleviates itch and odor.
- VetWELL Ear Cleaner – Uses salicylic acid, lactic acid, and glycerin. Also contains aloe vera.
Be sure to always follow label instructions carefully when using any over-the-counter ear cleaner on your dog. And check with your veterinarian if you have any concerns about ingredients or how often to use the product.
When to See the Vet
If you notice no improvement in inflammation or foul odors in your dog’s ears after trying at-home cleaning remedies, it’s time to make an appointment with your veterinarian. Persistent inflammation and infection can lead to complications if left untreated. Your vet can examine your dog’s ears and determine if medication is needed to clear up the infection.
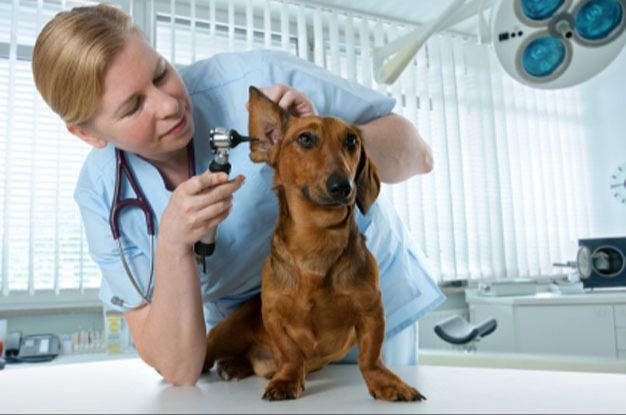
You should also bring your dog to the vet if they seem to be in pain or are scratching their ears aggressively. Scratching can lead to cuts, hematomas, and other injuries that require medical treatment. Excessive head shaking or tilting can also indicate a potentially serious problem in the ear canal or inner ear. It’s better to err on the side of caution and have your vet take a look to make sure your dog’s ears are healthy.
Prevention Tips
Keeping your dog’s ears clean and healthy starts with prevention. Here are some tips to help prevent ear infections and keep your dog’s ears in good shape:
Keep ears dry after baths/swimming – Be sure to thoroughly dry your dog’s ears after they get wet from bathing or swimming. Excess moisture in the ears can lead to infection. Gently wipe the inside of the ears with a soft towel or cotton ball.
Clean ears after grooming – Hair plucked from the ear canal during grooming can get trapped inside the ear. Use an ear cleaner to gently wipe away any loose hair or debris after grooming sessions.
Ensure good nutrition – Diet can impact ear health. Make sure your dog’s food contains nutrients that support skin health. Omega fatty acids, zinc, and vitamins C and E are particularly important. Your vet may recommend supplements if your dog has chronic ear issues.