Introduction
Properly trimming your dog’s nails is an important part of maintaining their health and comfort. Overgrown nails can curl and split, become painful for your dog to walk on, and even lead to permanent damage of the toe structure. However, cutting into the quick, which contains the blood vessels and nerve endings, will be extremely painful and cause bleeding. Therefore, nail trimming requires care and technique to avoid hitting this sensitive area.
By learning about the anatomy of your dog’s nails, recognizing when they need a trim, using the proper tools, and taking precautions, you can safely pare down overgrown nails. With practice and positive reinforcement, regular nail upkeep can become a simple routine. Your dog will be happier, healthier, and better off for having trimmed nails that allow normal use of their feet.
Anatomy of Dog Nails
A dog’s nail is made up of several parts that you need to understand before trimming them.
The outer part that you can see is a clear or pigmented shell called the nail “wall.” This protects the soft tissue underneath. Under the hard nail shell is a vein that supplies blood to the nail bed called the “quick.” The quick contains sensitive nerve endings and blood vessels. If you cut into the quick, it will bleed and be painful for your dog.
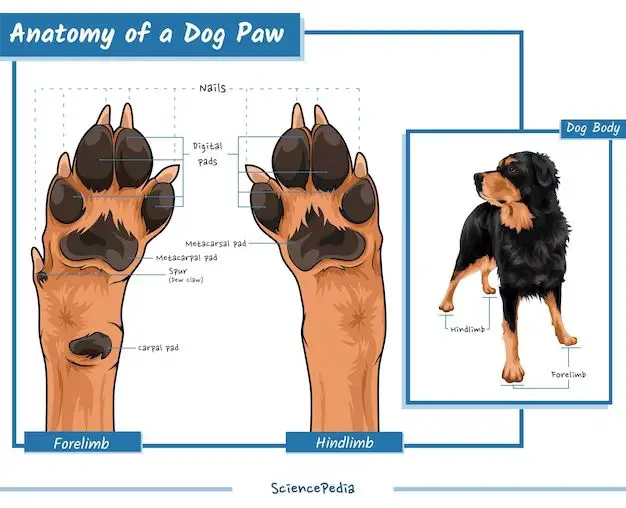
The quick recedes back toward the paw as the nail grows outward from the cuticle. The cuticle is the thickened skin where the nail emerges from the paw. The goal is to trim just in front of the quick, where the nail is dead and without feeling.
Signs It’s Time to Trim
It’s important to regularly trim your dog’s nails before they get overly long. Here are some signs that indicate it’s time for a trim:
Overly Long Nails
If your dog’s nails are so long they are clicking on the floor when they walk, it’s definitely time for a trim. Long nails can cause their toes to splay and put stress on their legs and joints.
Curling and Twisting
If your dog’s nails have started to curl around and twist, they are too long. The nail curling under can be uncomfortable for your dog and lead to infections.
Trimming nails regularly, about every 2-4 weeks, can prevent overly long nails. Pay attention to the sound when your dog walks on hard floors. If you hear clicking or tapping sounds, it likely means their nails should be trimmed.
Trimming Equipment
Proper equipment is essential for a safe and effective nail trimming experience. There are a few key tools you’ll need:
Nail Clippers
High-quality nail clippers designed specifically for dogs are a must-have. Look for clippers made of stainless steel with sharp, finely tapered cutting edges. Choose a size appropriate for your dog – smaller clippers for toy breeds and larger ones for big dogs. Most clippers will have a safety guard to help avoid cutting into the quick.
Nail Files
A coarse nail file is useful for gently smoothing any sharp edges after clipping. Emery boards and pet-specific nail files work well. Look for ones with a rigid back to make filing easier.
Styptic Powder
Styptic powder helps stop bleeding if you cut the quick. It’s an important product to have on hand. Look for a high-quality styptic powder at pet stores – it’s usually a clotting agent made of ingredients like benzocaine, aloe, and potassium ferric sulfate. Apply it to the nail if any bleeding occurs.
With the proper high-quality tools, you’ll be ready to trim your dog’s nails safely and confidently.
Prep Your Dog
Properly preparing your dog before a nail trim can make the process much easier for both of you. Try these techniques to keep your dog calm:
- Positive reinforcement. Give your dog praise and treats for cooperating during nail trims. This will teach them nail trims are a positive experience.
- Get them comfortable with handling. Touch their paws often so they become desensitized. Gently squeeze their toes and apply light pressure to their nails.
- Introduce the tools. Let your dog sniff and investigate the nail clippers so they aren’t scared of them.
- Find a helper. Have someone assist by giving treats, soothing your dog and keeping them still.
- Avoid restraint. Forcing your dog to hold still can make them anxious. Use positive methods instead.
- Watch for signs of stress. If your dog seems very agitated, stressed or in pain, stop and try again later.
With patience and positive reinforcement, you can make nail trims an easy, painless routine.
Locate the Quick
Before trimming your dog’s nails, it’s crucial to locate the quick, which is the blood vessel inside the nail. Cutting into the quick will cause bleeding and pain. Here’s how to find the proper cutting location just above the quick:
– Look at the color of the nail. The quick is a darker pink color while the dead nail is white/clear. Cut just before you see the color change.

– Examine the nail length. The quick grows with the nail, so longer nails have a longer quick. Trim only the dead white/clear nail on long nails.
– Shine a flashlight through the nail to see the pinkish quick inside.
– Go slowly, trimming small bits at a time until you see a black dot appear, indicating you’re at the start of the quick.
– Know that dewclaws often have very short quicks, so trim less of these nails.
Being able to identify where the quick is before cutting will allow you to safely trim your dog’s nails without going into the blood vessel and causing them harm.
The Cutting Procedure
When it’s time to make the cut, follow these step-by-step instructions:
1. Position your dog either sitting or lying down. Many find it easiest to have the dog lie on its side.
2. Lift the paw and gently extend one toe, exposing the nail.
3. Locate where the quick ends based on the pink coloration.
4. Position the clippers perpendicular to the nail, a few millimeters above the quick.
5. Make one confident cut straight across to avoid splintering the nail.
6. Release the toe and examine the cut edge for any sign of blood or the quick.
7. If bleeding occurs, apply styptic powder or cornstarch to stop it.
8. Repeat the process with each nail, one paw at a time.
9. Give your dog praise and treats throughout for being patient and still.
10. Finish by filing any rough edges to smooth them.
Troubleshooting Problems
Nail trimming doesn’t always go smoothly, even for the most patient owners and dogs. Here are some common issues and solutions:
Squirmy or Scared Dog
If your dog won’t hold still, try wrapping them in a towel burrito-style to keep them contained. Have a helper gently hold and reassure your dog. Give treats and praise for brief moments of calm behavior. Go slowly and take breaks as needed.
Bleeding From Cutting the Quick
It happens to most dog owners eventually. Stop the bleeding by applying styptic powder or a small amount of cornstarch or flour. If the bleeding doesn’t stop within 5-10 minutes, call your vet.
Cracked or Split Nails
This is usually from letting nails get overgrown. File down cracked nails gently with an emery board. See your vet if the nail is fully split to determine if any part needs to be removed.
Overly Long Quick
If you can’t seem to cut your dog’s nails short enough, the quick has likely grown out with the nail. Have your vet show you where it’s safe to cut, then maintain regular trims to push the quick back.
Aftercare
After you’ve finished trimming your dog’s nails, it’s important to properly care for them afterwards. Here are some tips for aftercare:
Apply Styptic Powder to Stop Bleeding
If you accidentally cut the quick and your dog’s nail begins to bleed, don’t panic. Have some styptic powder on hand to help stop the bleeding. Gently dip the end of the nail into the styptic powder. The powder will help constrict the blood vessels and stop the bleeding. Hold for a few seconds until the bleeding has stopped. Styptic powder is an essential item to keep in your dog grooming kit.
Soothe and Calm Your Dog
Getting nails trimmed can be stressful for some dogs. Be sure to soothe and calm your dog after the process with lots of praise, pets, and treats. This will help prevent any nail trimming anxiety from developing. You may also want to schedule nail trimming after a long walk or vigorous play session so your dog is more relaxed.
Following these aftercare tips can help make nail trimming a more positive experience for both you and your furry friend!
Maintenance Schedule
How often you should trim your dog’s nails depends on several factors:
-
Breed – Active breeds like retrievers need more frequent trims than less active breeds.
-
Age – Puppies’ nails grow faster so may need weekly trims. Older dogs’ nails grow slower so monthly is often enough.
-
Environment – Dogs who walk on sidewalks may wear down their nails naturally, reducing the need for trimming. Rural dogs on soft ground need more trims.
-
Health – Overgrown nails can exacerbate conditions like arthritis. More frequent trims may be needed.
Most adult dogs need trims every 2-4 weeks. Puppies and active breeds may need weekly trims. Elderly or inactive dogs can go 6-8 weeks between trims. Examine your dog’s nails regularly and trim as soon as they get too long.